
Homemade Gummy Bears
on Aug 07, 2024
This post may contain affiliate links. Please read our disclosure policy.
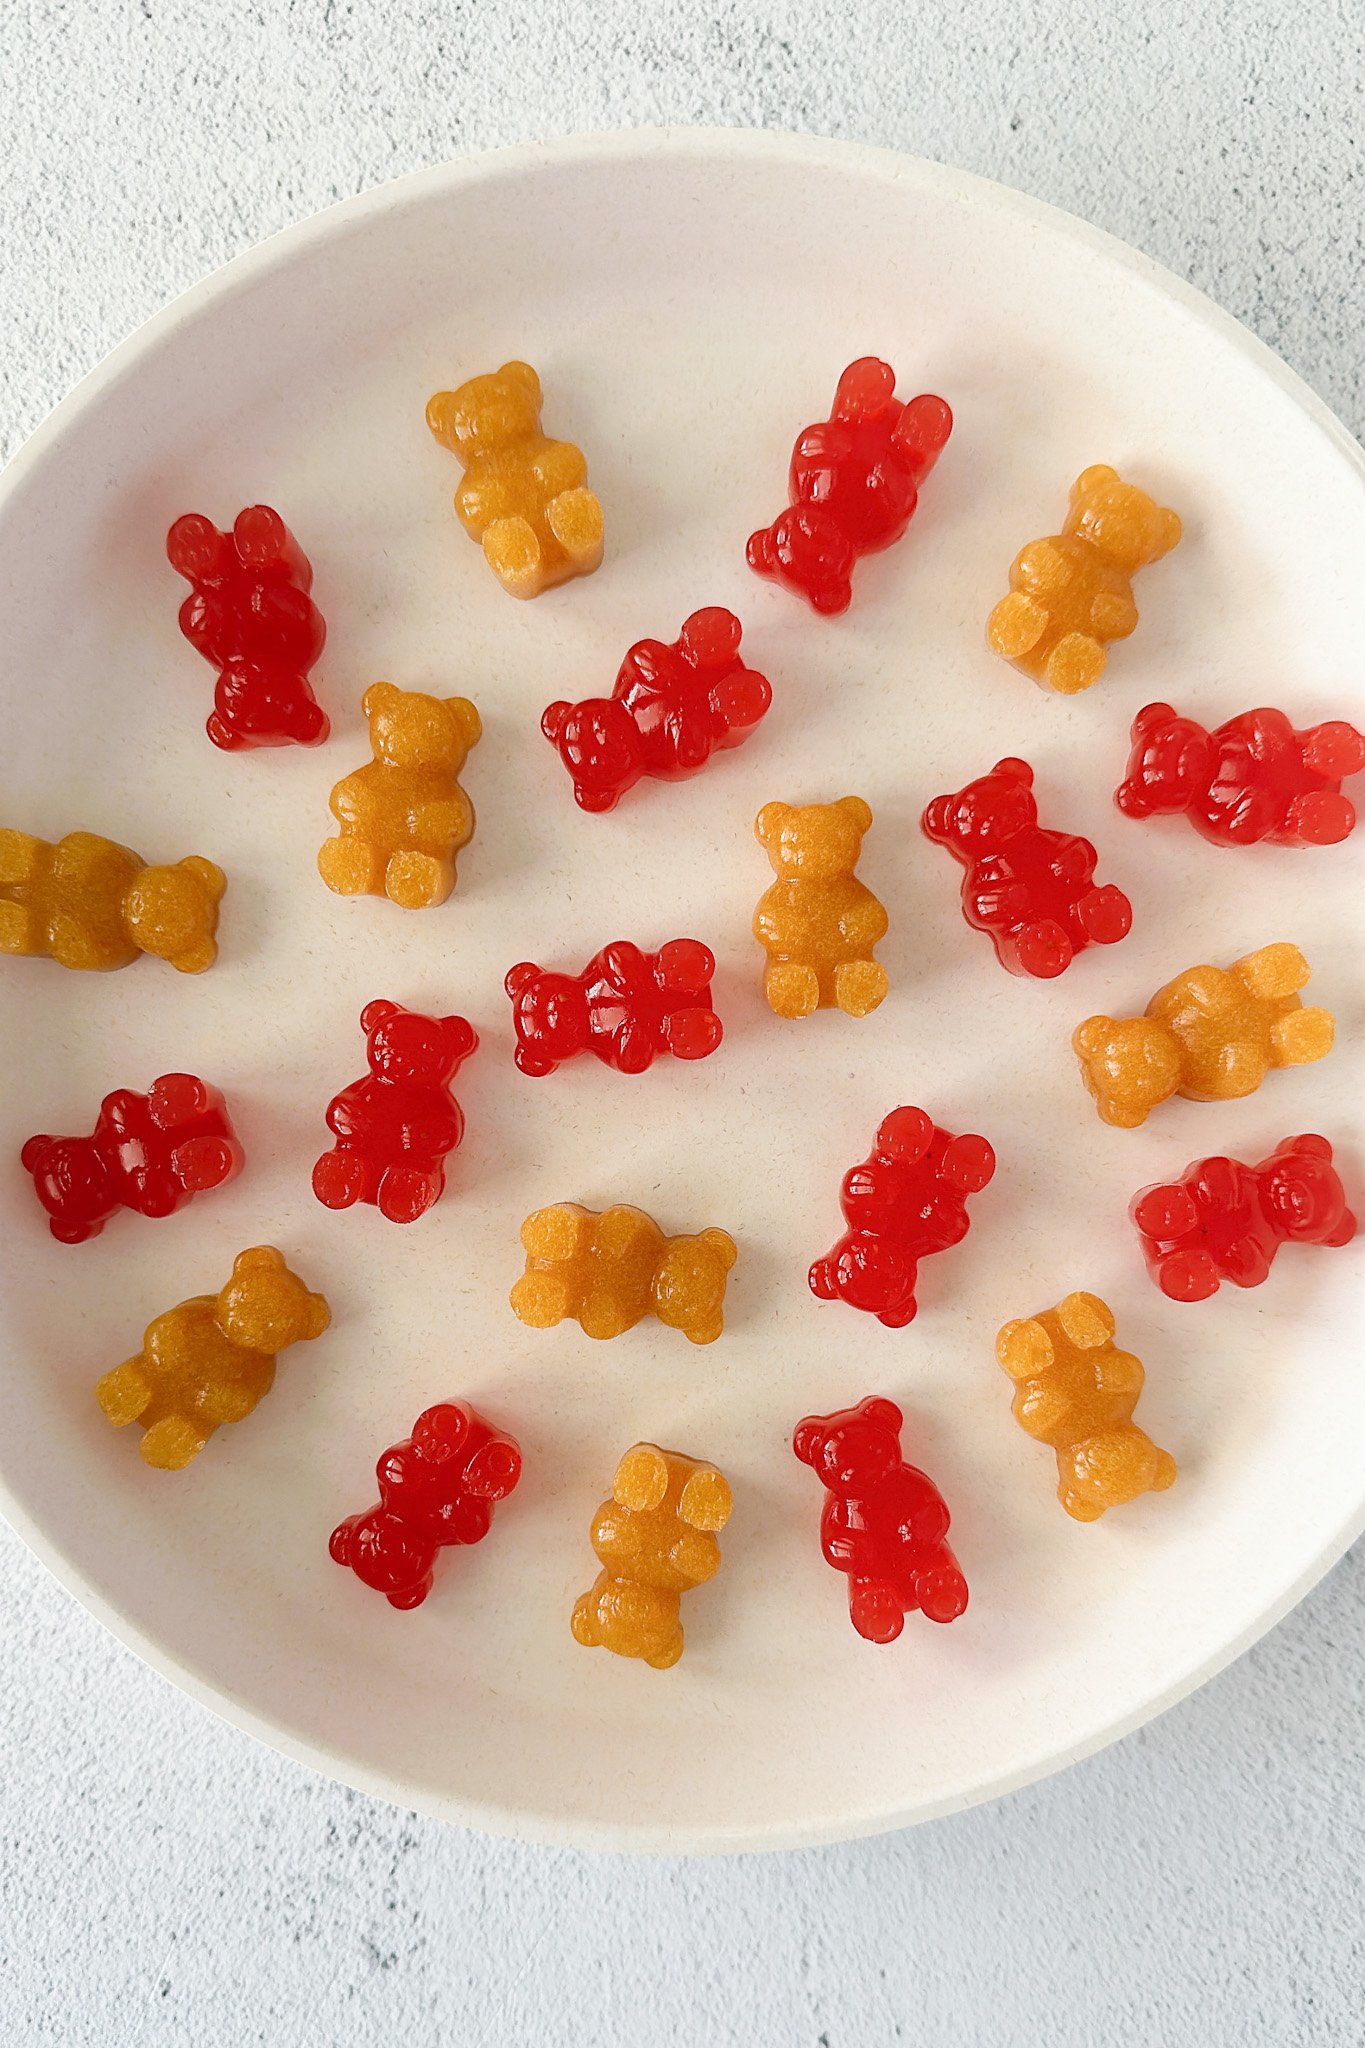
Gummy bears are a classic sweet treat and so easy to make right from home! These homemade gummy bears are tasty, customizable treats using natural ingredients for a fun alternative to store-bought gummies that your kids will love!
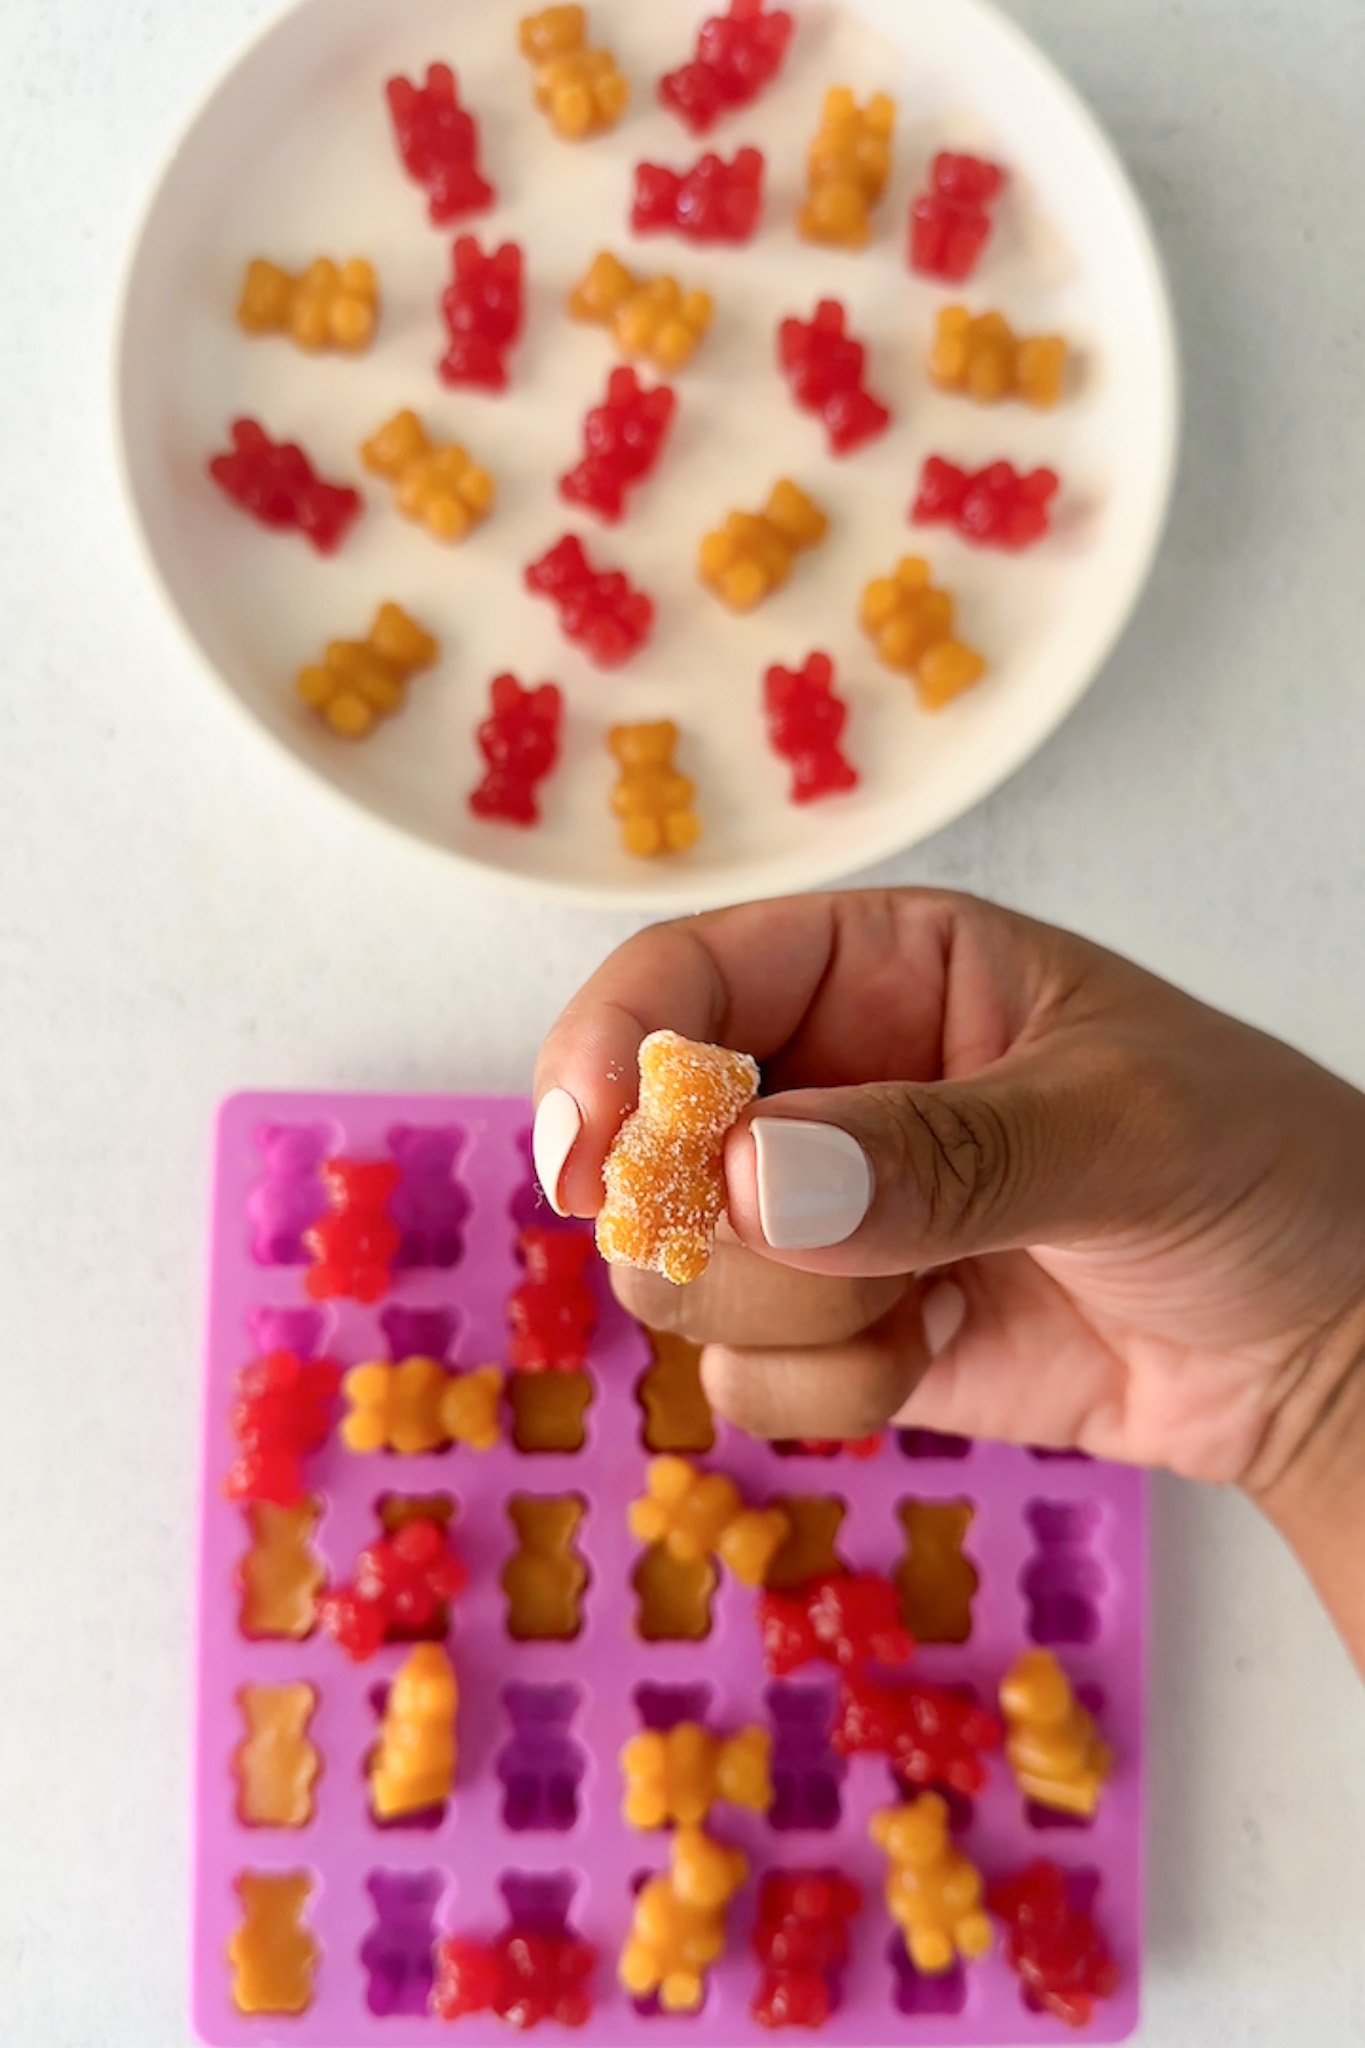
These homemade gummy bears aren’t like the typical gummy bears you’ll find in stores. They are sweetened with fruits which make for the best vibrant colors without any dyes! You can customize them with your favorite fruits and serve them plain or with a mix of sugar and citric acid for easy homemade sour gummies.
If you love these gummy bears, you’ll also love these homemade gummy worms with added veggies in the mix! And if you’re looking for more copycat store-bought snacks and treats, be sure to try out these homade ritz crackers, homemade chewy granola bars, and homemade goldfish crackers!
Table of Contents
What You’ll Need
Here is what you’ll need to make these homemade gummy bears:
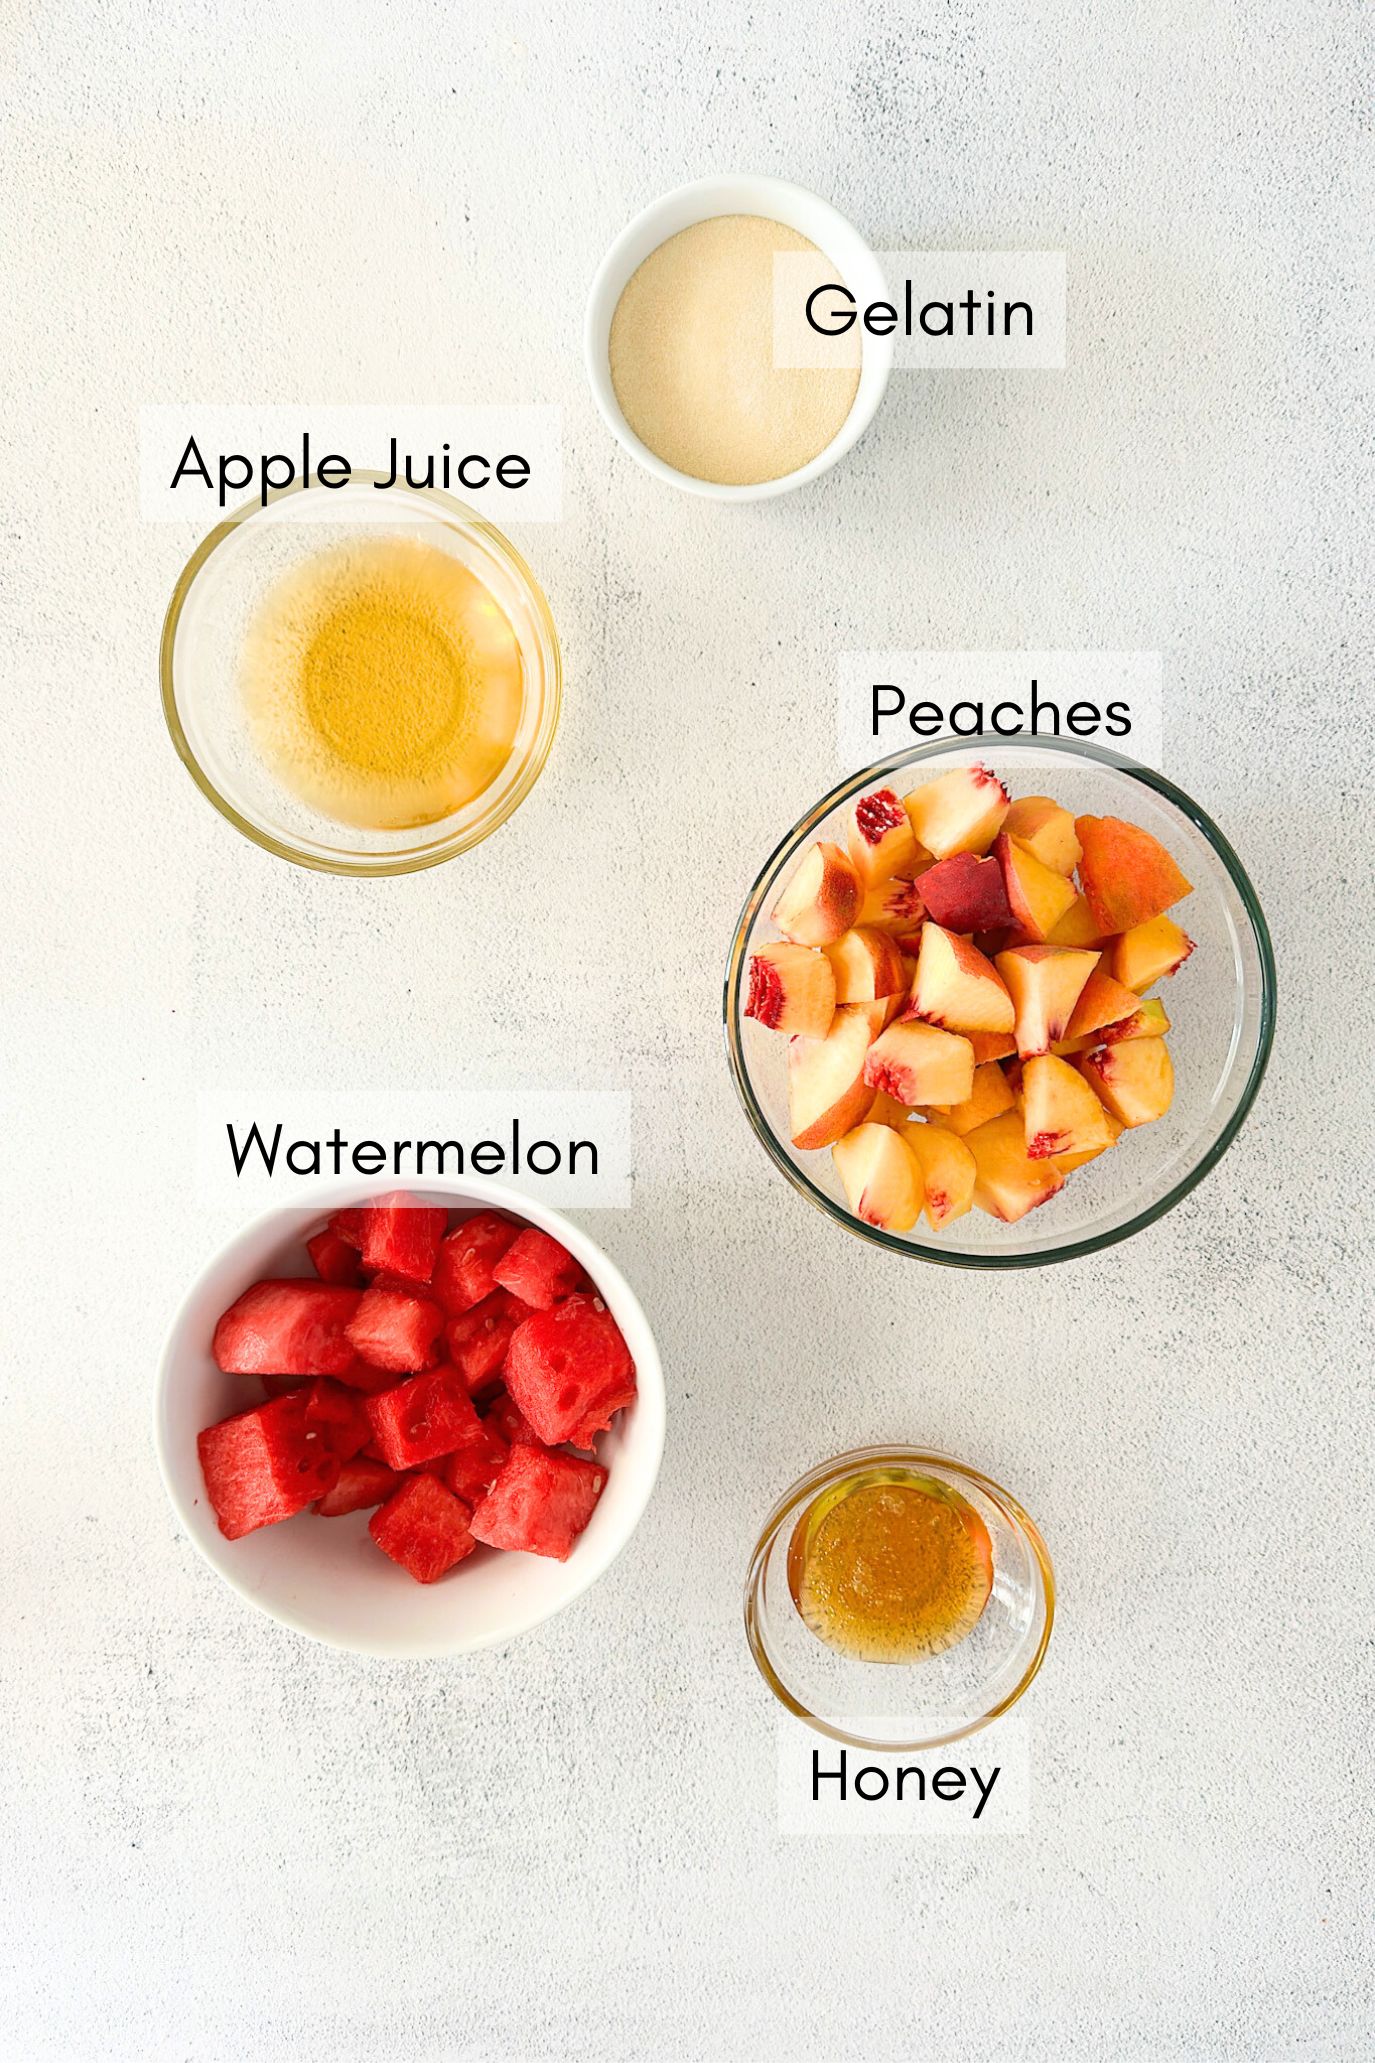
- Chopped Fruits: The base flavor for these homemade gummy bears. I used chopped peaches and watermelon for this recipe for bright and vibrant color and flavor, but you can use your favorite fruits!
- Unsweetened Apple Juice: To loosen the texture of the blended mixture for thick purees. Opt for apple juice that is naturally sweetened with no added sugar.
- Honey: The main source of sweetness for these homemade gummies. Feel free to adjust the amount to your taste.
- Gelatin: The main binding agent to help the mixture obtain the “gummy” texture when cooled. Make sure to use unflavored gelatin.
- Citric Acid & Sugar: Optional coating mixture for sour gummy bears.
See the recipe card below for full information on ingredients and quantities.
Ingredient Substitutions & Additions
- Apple Juice: You may replace the apple juice with equal parts water, but note that the puree mixture will be slightly less sweet. If desired, adjust the amount of honey to taste.
- Honey: The honey may be replaced with equal parts maple syrup.
Step By Step Instructions
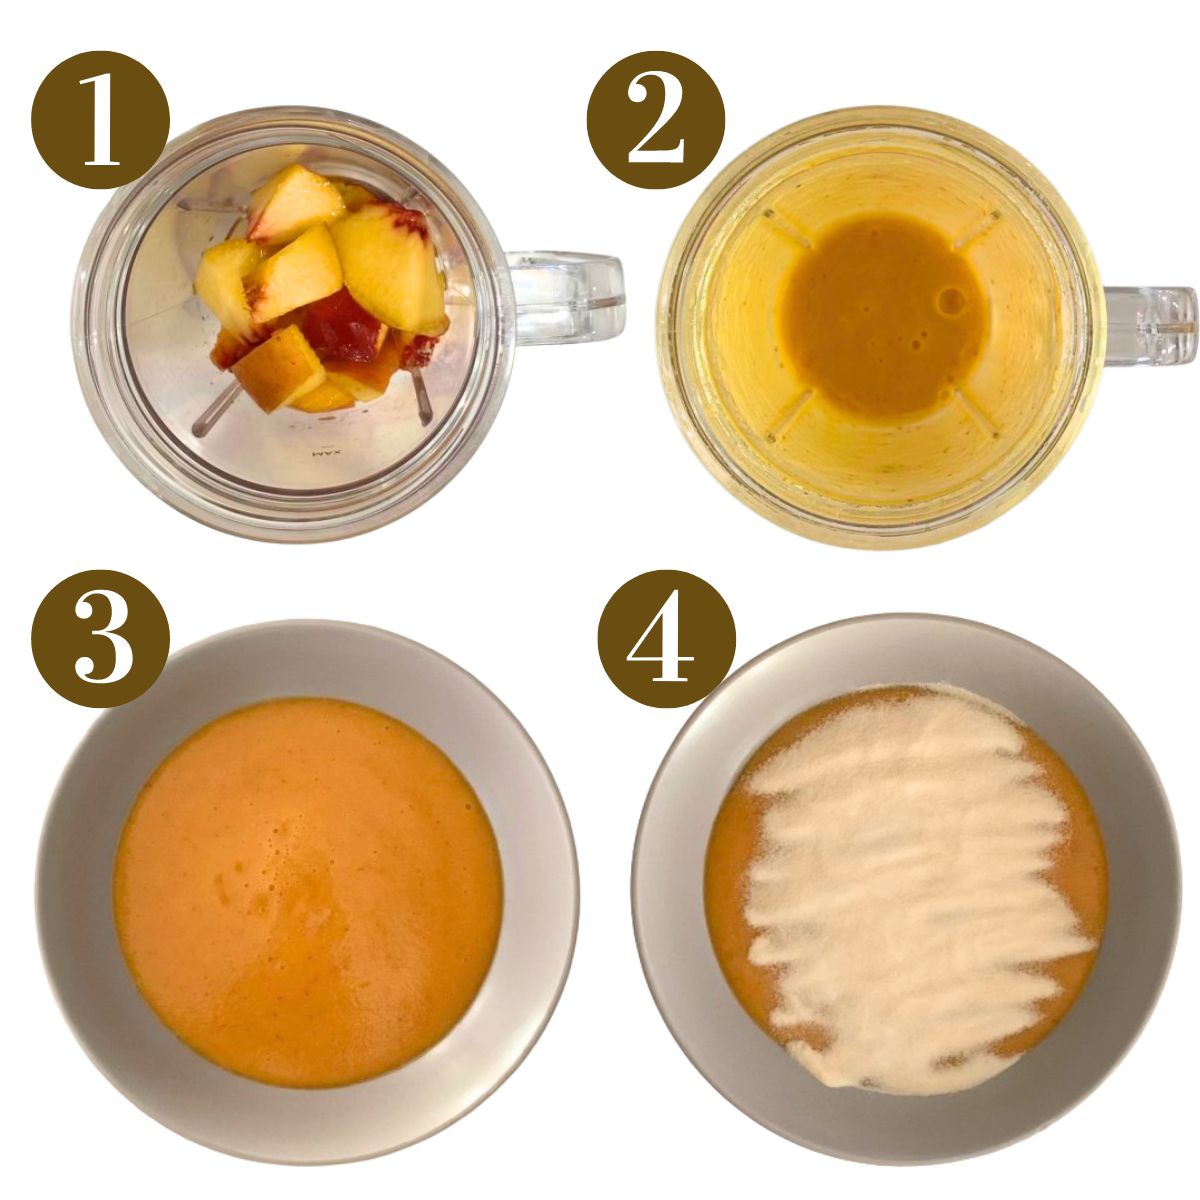
STEP 1: Blend the chopped fruit, apple juice, and honey in blender until smooth. Let it blend until the mixture is smooth and pureed (we don’t want any chunks here!) (Images 1 & 2). Taste the mixture at this point and adjust the sweetness as desired.
STEP 2: Pour the mixture into a bowl and sprinkle the gelatin all over the top of the mixture. Let it sit as the gelatin “blooms” for 5 minutes. (Images 3 & 4).
STEP 3: After 5 minutes, give the mixture a mix (it will be thick in texture) and transfer this mixture to a saucepan over medium heat to allow the gelatin to dissolve. You want the mixture to be heated through, not boiling.
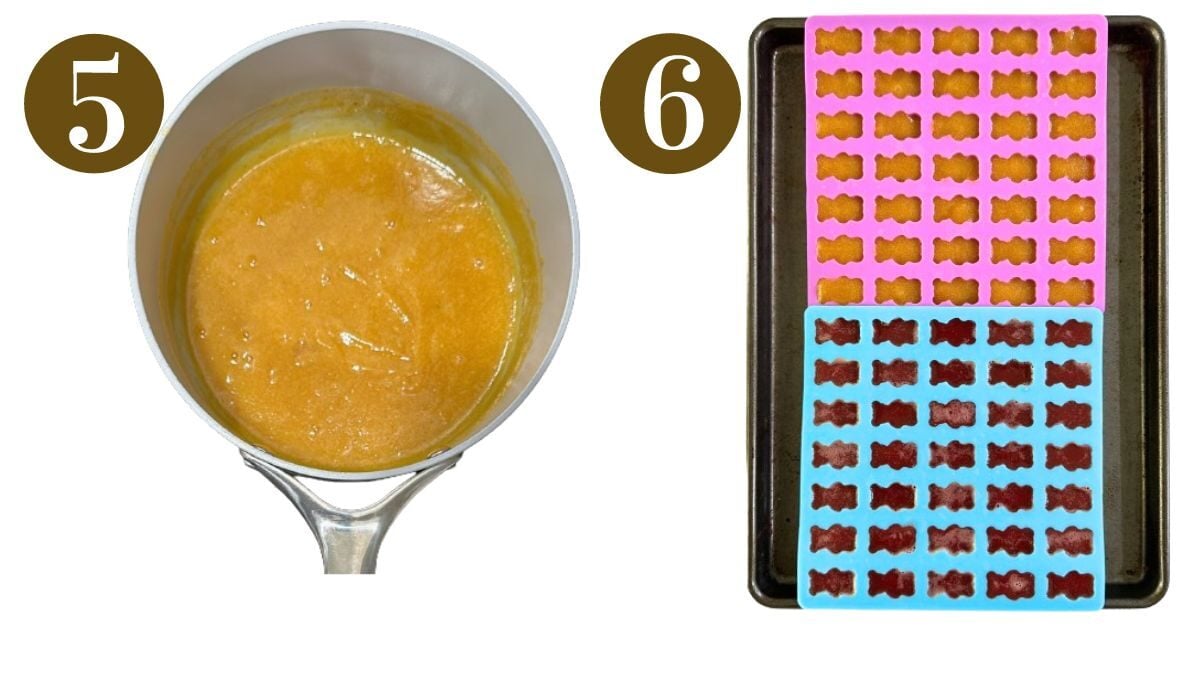
STEP 4: As the mixture begins to heat up, whisk it until it is smooth and there are no clumps of undissolved gelatin. If you notice any small clumps, break them up with a cooking utensil until the mixture is smooth (Image 7). The mixture should have the same liquid consistency as when it was blended.
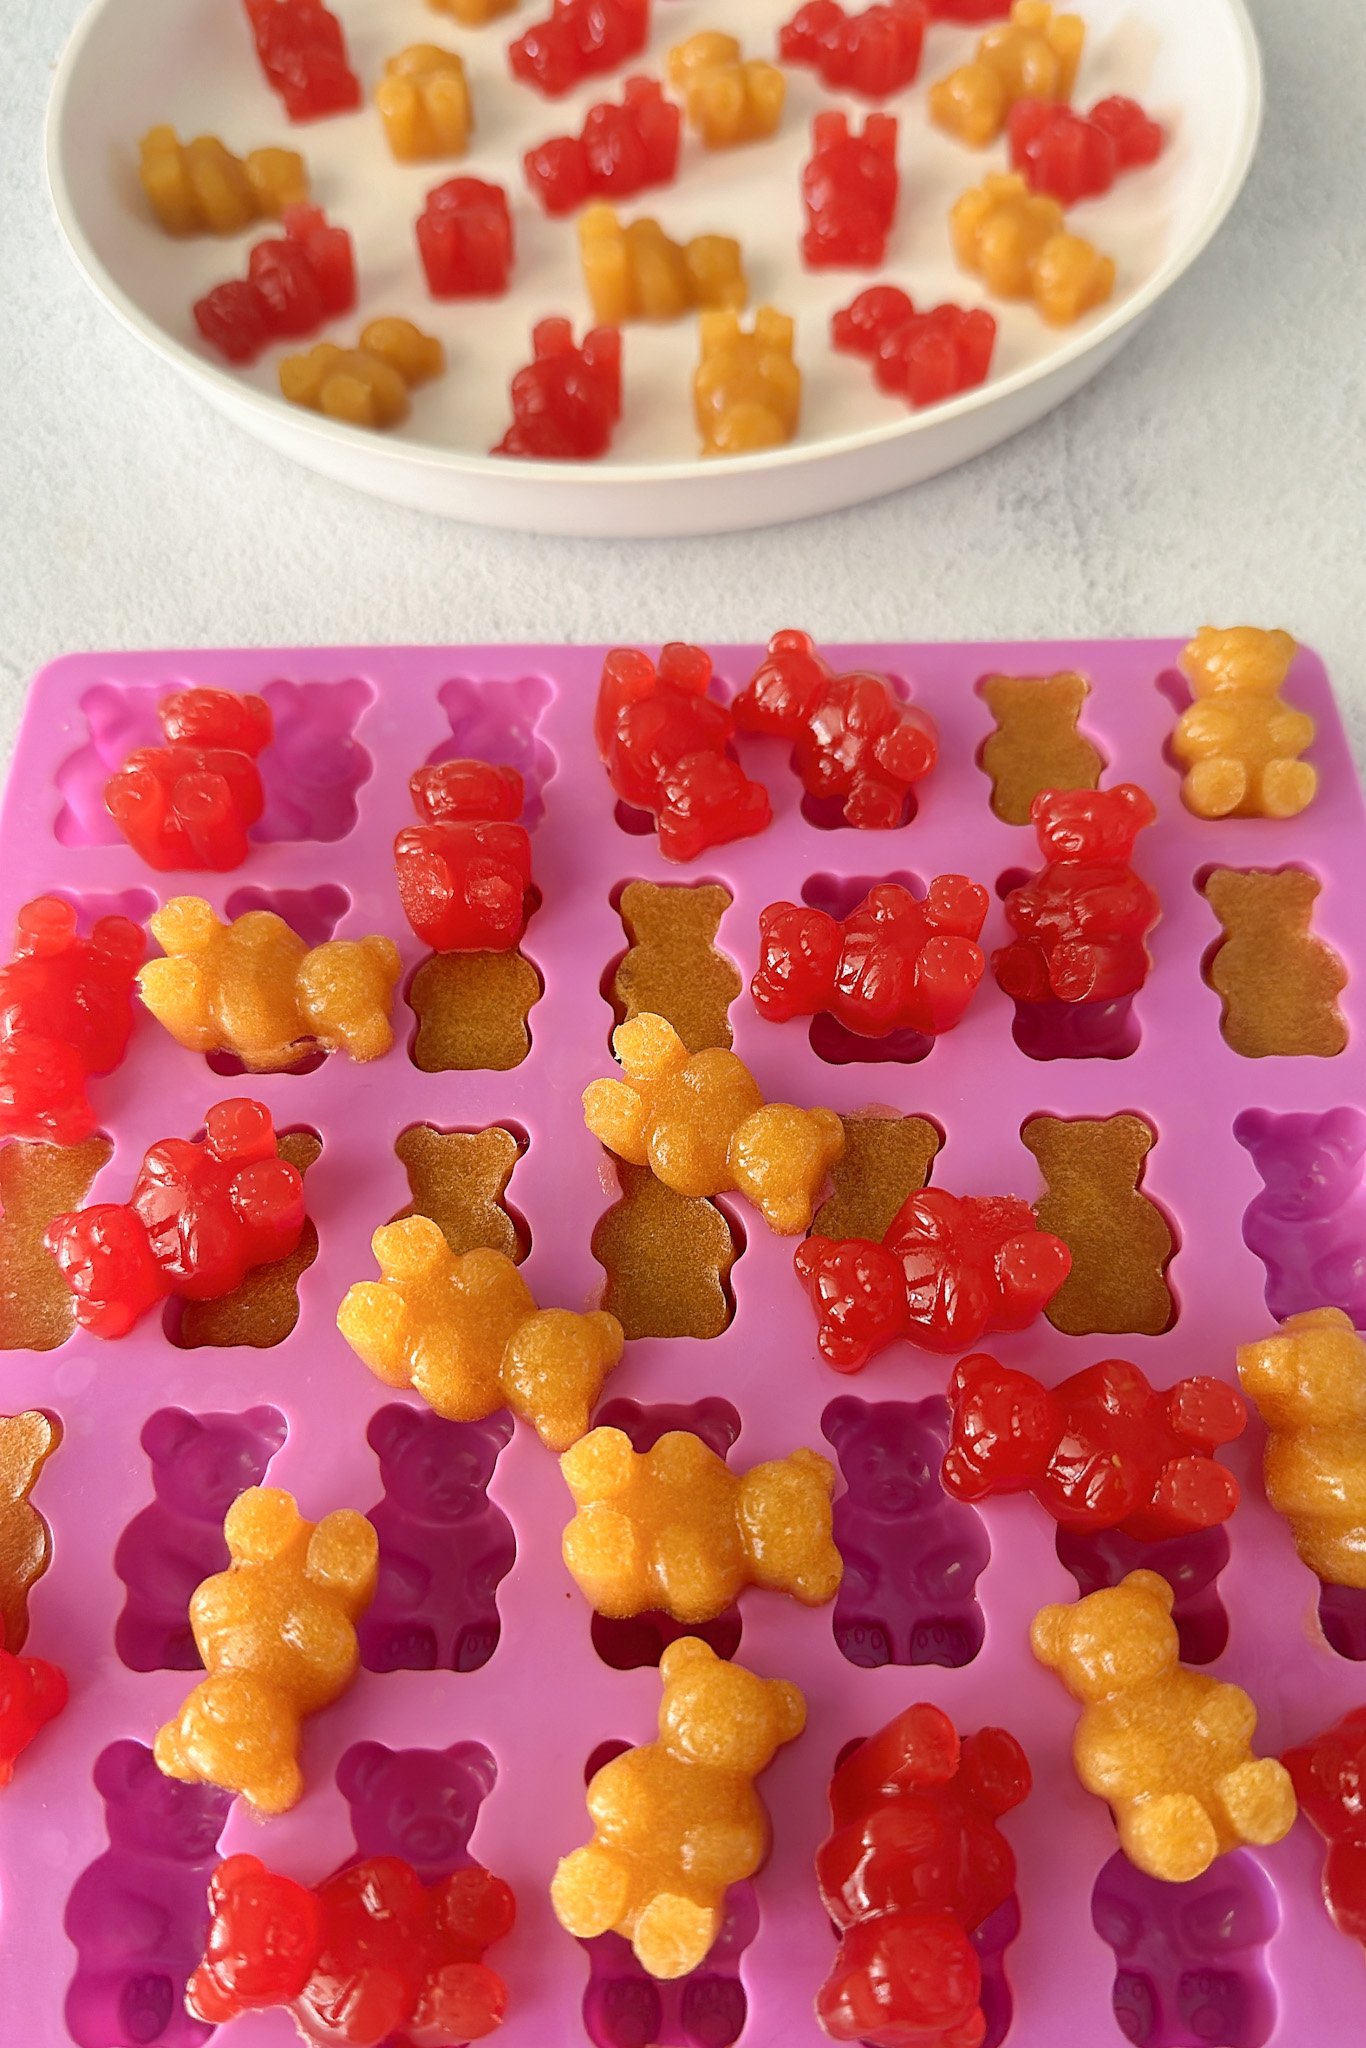
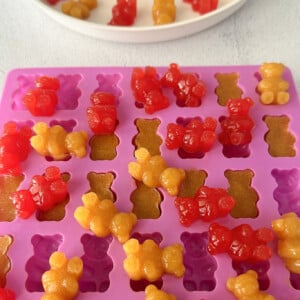
STEP 5: Place the gummy bear molds on top of a baking tray. Use a dropper or small spoon to portion the liquid into the molds (Image 6).
STEP 6: Transfer to the refrigerator and let the gummies set for at least 2 hours, or overnight. The longer they set, the better. Remove them from the molds and serve! *Tip* For chewier peach gummies, remove the gummy bears from the molds after 2 hours and air dry them overnight for 12 hours. This will dry out the moisture from the gummy bears and make them chewier in texture, more similar to that of classic store-bought gummy bears. This “drying out” method does not work for the watermelon flavored gummy bears since watermelon contains more moisture.
STEP 7: For optional sour gummies, mix together the granulated sugar and citric acid in a small bowl until combined. Dip the gummy bears into the mixture to coat and serve immediately. Only dip the gummies right before serving because the coating will draw out moisture from the gummies and melt quickly.
Storage Instructions
Once set, store the gummy bears in an airtight container in the fridge for up to 1 week. Gelatin does not generally freeze well, so I do not recommend freezing them. If you are using the “dry out” method for the peach flavored gummies, they can store them at room temperature for up to 5 days.
Tips For Success
- Make sure to use a powerful blender to blend all of the ingredients together. I love using this nutribullet blender because it ensures that there are no clumps and that the mixture is as smooth as possible.
- These bear molds make the perfect-sized bears that pop right out of the molds! I love these molds in particular because the gummies are larger than typical bear gummies.
- When placing the liquid into the gummy bear molds, make sure that the molds are on top of a baking pan. It will be much easier to transfer the molds to the fridge to set if they are on a baking pan.
- These gummy bears do not have the same texture as store-bought bears since they don’t have added preservatives, corn syrup, or waxes. They are more jelly-like in texture, but very easy for little ones to break down and chew. For chewier peach gummies (this method doesn’t work well for the watermelon flavor), remove the gummies from the molds after 2 hours and air dry them overnight for 12 hours. This will dry out the moisture from the gummy bears and make them chewier in texture, more similar to that of classic store-bought gummy bears.
Recipe FAQs
These gummy bears do not have the same texture as store-bought bears since they don’t have added preservatives, corn syrup, or waxes. They are more jelly-like in texture, but very easy for little ones to break down and chew. For chewier peach gummies (this method doesn’t work well for the watermelon flavor), remove the gummies from the molds after 2 hours and air dry them overnight for 12 hours. This will dry out the moisture from the gummy bears and make them chewier in texture, more similar to that of classic store-bought gummy bears.
Yes! To make sour gummy bears, you can coat the bears in a mixture of citric acid and granulated sugar to achieve that effect. If you are doing so, make sure to only do this right before serving as the citric acid sugar coating will begin to draw out moisture from the gummies and cause them to melt.
You can use chopped strawberries, raspberries, blueberries, or apples for these gummies! I don’t recommend using something like pineapples because the enzymes in pineapples do not react well with gelatin.
Other Fruit Recipes You’ll Love
Baby Yogurt Melts (With Freeze-Dried Fruits!)
Berry Bliss Balls
Healthy Blueberry French Toast Bake
Strawberry Jam Crumble Bars
If you tried these Homemade Gummy Bears please leave a ⭐ star rating and let me know how it went in the comments below! I love hearing from you!
Homemade Gummy Bears
Equipment
Ingredients
Peach Gummy Bears
- 2 cups chopped peaches, from about 2 medium peaches
- ¼ cup unsweetened apple juice
- 3 tbsp honey
- 3 tbsp gelatin
Watermelon Gummy Bears
- 2 ¼ cups chopped watermelon
- 2 tbsp honey
- 3 tbsp gelatin
Optional Sour Coating
- 2 tbsp granulated sugar
- 1 tsp citric acid
Instructions
- Blend the chopped fruit, apple juice, and honey in blender until smooth. Let it blend until the mixture is smooth and pureed (we don't want any chunks here!) Taste the mixture at this point and adjust the sweetness as desired.
- Pour the mixture into a bowl and sprinkle the gelatin all over the top of the mixture. Let it sit as the gelatin "blooms" for 5 minutes.
- After 5 minutes, give the mixture a mix (it will be thick in texture) and transfer this mixture to a saucepan over medium heat to allow the gelatin to dissolve. You want the mixture to be heated through, not boiling.
- As the mixture begins to heat up, whisk it until it is smooth and there are no clumps of undissolved gelatin. If you notice any small clumps, break them up with a cooking utensil until the mixture is smooth. The mixture should have the same liquid consistency as when it was blended.
- Place the gummy bear molds on top of a baking tray. Use a dropper or small spoon to portion the liquid into the molds.
- Transfer to the refrigerator and let the gummies set for at least 2 hours, or overnight. The longer they set, the better. Remove them from the molds and serve! *Tip* For chewier peach gummies, remove the gummy bears from the molds after 2 hours and air dry them overnight for 12 hours. This will dry out the moisture from the gummy bears and make them chewier in texture, more similar to that of classic store-bought gummy bears. This "drying out" method does not work for the watermelon flavored gummy bears since watermelon contains more moisture.
- For optional sour gummies, mix together the granulated sugar and citric acid in a small bowl until combined. Dip the gummy bears into the mixture to coat and serve immediately. Only dip the gummies right before serving because the coating will draw out moisture from the gummies and melt quickly.
Notes
- Make sure to use a powerful blender to blend all of the ingredients together. I love using this nutribullet blender because it ensures that there are no clumps and that the mixture is as smooth as possible.
- These bear molds make the perfect-sized bears that pop right out of the molds! I love these molds in particular because the gummies are larger than typical bear gummies.
- When placing the liquid into the gummy bear molds, make sure that the molds are on top of a baking pan. It will be much easier to transfer the molds to the fridge to set if they are on a baking pan.
- These gummy bears do not have the same texture as store-bought bears since they don’t have added preservatives, corn syrup, or waxes. They are more jelly-like in texture, but very easy for little ones to break down and chew. For chewier peach gummies (this method doesn’t work well for the watermelon flavor), remove the gummies from the molds after 2 hours and air dry them overnight for 12 hours. This will dry out the moisture from the gummy bears and make them chewier in texture, more similar to that of classic store-bought gummy bears.


Good recipe but it took too long for me and then I had to rush to clean everything before it all set up lol
Do you have any recipes using fruit juice for gummies?
It turned out good, but watermelon is in season for part of the year .. Has anyone tried freezing the watermelon after blending, so it can be made later?
Are these to be stored in the fridge or pantry? Any ideas on their shelflife?
Hi Briana! Here are the storage instructions for these gummies😊
Once set, store the gummy bears in an airtight container in the fridge for up to 1 week. Gelatin does not generally freeze well, so I do not recommend freezing them. If you are using the “dry out” method for the peach flavored gummies, they can store them at room temperature for up to 5 days.
your other recipe says to use canned carrots to speed up the process. do you think canned peaches would also work? thanks!
Hi Mehie! Yes, canned peaches would also work, I’d just make sure to drain out any excess liquid😊